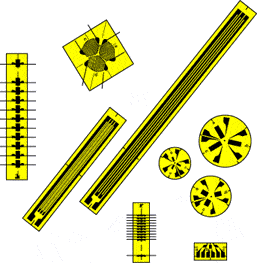
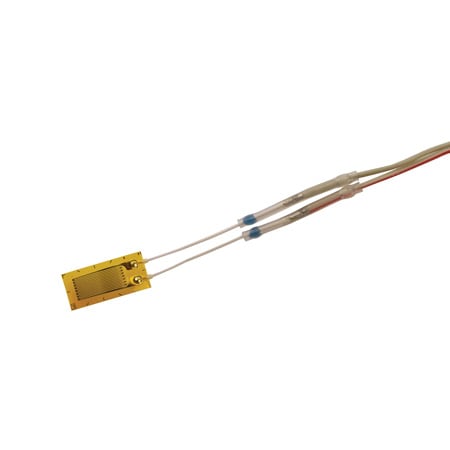
The most universal measuring device for the electrical measurement of mechanical quantities is the strain gage. Several types of strain gages depend on the proportional variance of electrical resistance to strain: the piezoresistive or semi-conductor gage, the carbon-resistive gage, the bonded metallic wire, and foil resistance gages.
The bonded resistance strain gage is by far the most widely used in experimental stress analysis. These gages consist of a grid of very fine wire or foil bonded to the backing or carrier matrix. The electrical resistance of the grid varies linearly with strain. In use, the carrier matrix is bonded to the surface, force is applied, and the strain is found by measuring the change in resistance. The bonded resistance strain gage is low in cost, can be made with a short gage length, is only moderately affected by temperature changes, has small physical size and low mass, and has fairly high sensitivity to strain.
Learn more about strain gauge
 In a strain gage application, the carrier matrix and the adhesive must work together to transmit the strains from the specimen to the grid. In addition, they serve as an electrical insulator and heat dissipator.
The three primary factors influencing gage selection are operating temperature, state of strain (gradient, magnitude, and time dependence) and stability required.
Because of its outstanding sensitivity, the Wheatstone bridge circuit is the most frequently used circuit for static strain measurements. Ideally, the strain gage is the only resistor in the circuit that varies and then only due to a change in strain on the surface.
There are two main methods used to indicate the change in resistance caused by strain on a gage in a Wheatstone bridge. Often, an indicator will rebalance the bridge, displaying the change in resistance required in micro-strain. the second method installs an indicator, calibrated in micro-strain, that responds to the voltage output of the bridge. This method assumes a linear relationship between voltage out and strain, an initially balanced bridge, and known V in. In reality, the V out-strain relationship is nonlinear, but for strains up to a few thousand micro-strain, the error is not significant.
Potential Error Sources
In a stress analysis application, the entire gage installation cannot be calibrated as can some pressure transducers. Therefore, it is important to examine potential error sources prior to taking data.
PRIME STRAIN GAGE SELECTION CONSIDERATIONS
Some gages may be damaged during installation. It is important therefore to check the resistance of the strain gage prior to stress.
Electrical noise and interference may alter your readings. Shielded leads and adequately insulating coatings may prevent these problems. A value of less than 500 M ohms (using an ohmmeter) usually indicates surface contamination.
Thermally induced voltages are caused by thermocouple effects at the junction of dissimilar metals within the measurement circuit. Magnetically induced voltages may occur when the wiring is located in a time varying magnetic field. Magnetic induction can be controlled by using twisted lead wires and forming minimum but equal loop areas in each side of the bridge.
Temperature effects on gage resistance and gage factor should be compensated for as well. This may require measurement of temperature at the gage itself, using thermocouples, thermistors, or RTDs. Most metallic gage alloys, however, exhibit a nearly linear gage factor variation with temperature over a broad range which is less than ±1% within ±100°C.
Strain gage dimensions
The active grid length, in the case of foil gages, is the net grid length without the tabs and comprises the return loops of the wire gages. The carrier, dimensions are designed by OMEGA for the optimum function of the strain gage.
Strain gage resistance
The resistance of a strain gage is defined as the electrical resistance measured between the two metal ribbons or contact areas intended for the connection of measurement cables. The range comprises strain gages with a nominal resistance of 120, 350, 600, and 700 Ohms.
Gage Factor (Strain Sensitivity)
The strain sensitivity k of a strain gage is the proportionality factor between the relative change of the resistance.
The strain sensitivity is a figure without dimension and is generally called gage factor.
The gage factor of each production lot is determined by sample measurements and is given on each package as the nominal value with its tolerance. Reference Temperature The reference temperature is the ambient temperature for which the technical data of the strain gages are valid, unless temperature ranges are given. The technical data quoted for strain gages are based on a reference temperature of 23°C.
Temperature Characteristic
Temperature dependent changes of the specific strain gage grid resistance occur in the applied gage owing to the linear thermal expansion coefficients of the grid and specimen materials. These resistance changes appear to be mechanical strain in the specimen. The representation of the apparent strain as a function of temperature is called the temperature characteristic of the strain gage application. In order to keep apparent strain through temperature changes as small as possible, each strain gage is matched during the production to a certain linear thermal expansion coefficient. OMEGA offers strain gages with temperature characteristics matched to ferritic steel and aluminum.
Service Temperature Range
The service temperature range is the range of ambient temperature where the use of the strain gages is permitted without permanent changes of the measurement properties. Service temperature ranges are different whether static or dynamic values are to be sensed.
Maximum Permitted RMS Bridge Energizing Voltage
The maximum values quoted are only permitted for appropriate application on materials with good heat conduction (e.g., steel of sufficient thickness) if room temperature is not exceeded. In other cases temperature rise in the measuring grid area may lead to measurement errors. Measurements on plastics and other materials with bad heat conduction require the reduction of the energizing voltage or the duty cycle (pulsed operation).
THE STRAIN GAGE IS ONE OF THE MOST IMPORTANT TOOLS
of the electrical measurement technique applied to the measurement of mechanical quantities. As their name indicates, they are used for the measurement of strain. As a technical term "strain" consists of tensile and compressive strain, distinguished by a positive or negative sign. Thus, strain gages can be used to pick up expansion as well as contraction. The strain of a body is always caused by an external influence or an internal effect. Strain might be caused by forces, pressures, moments, heat, structural changes of the material and the like. If certain conditions are fulfilled, the amount or the value of the influencing quantity can be derived from the measured strain value. In experimental stress analysis this feature is widely used. Experimental stress analysis uses the strain values measured on the surface of a specimen or structural part to state the stress in the material and also to predict its safety and endurance. Special transducers can be designed for the measurement of forces or other derived quantities, e.g., moments, pressures, accelerations, and displacements, vibrations and others. The transducer generally contains a pressure sensitive diaphragm with strain gages bonded to it.


